1. You need to install Exton-Slack on an ext4 partition. You must ensure that the current partition is created and formatted before you start the installation. In a Linux system, run the command (for example) mkfs.ext4 /dev /sdaX. You can also use GParted, which is included in Exton-Slack. In Windows XP/Vista/7/8, you can create and format your partitions with for example PartitionMagic.
2. In Exton-Slack all of your hard drive partitions are monted automatically when booting the system. Before you format, you must unmount the current partition. This is done with the command umount /dev/sdaX. ("X" must of course be replaced by the number of your current partition, e.g. /dev/sda6).
3. You must also create a SWAP space of about 2000 MB.
Then follow these steps:
1. So first create a Linux partition of about 6 GB and a swap space of about 2000 MB or twice the size of your computer's RAM (if you have RAM of 1024 MB or less). For that you can use GParted. If you use an existing Linux partition, you must make sure it is formatted before running the commands listed below. Hereinafter the Linux partition /dev/sda6 and SWAP partition /dev/sda8. (You must of course enter the correct name for your new or already existing Linux partition and SWAP partition).
2. Boot up the computer from the Exton-Slack disc and open up a terminal as root or become root with sudo su.
3. Run the command umount /dev/sda6
4. Run the command mkfs.ext3 /dev/sda6
5. Run the command cd /root/install
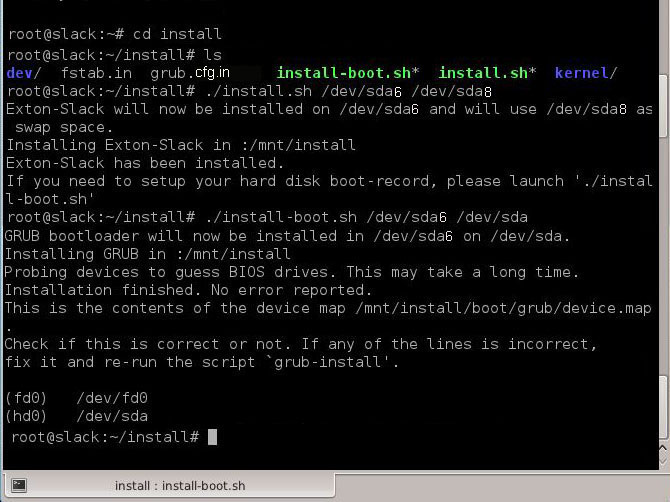
6. Run the command ./install.sh /dev/sda6 /dev/sda8 (IMPORTANT: The correct order of the installation partition and the SWAP partition)
7. If you do not already have a Linux system on your computer and want to use Grub2 as boot loader, you should eventually run the command ./install-boot.sh /dev/sda6 /dev/sda (Comment: This will install Grub2 on the install partition and in MBR - /dev/sda).
Done! See below how it looks when the above installation commands are executed.
Please note this
If you use the script install-boot.sh to install Grub2 (new Gub) in MBR (/dev/sda) you must edit /boot/grub/grub.cfg on /dev/sda6 (example) before you restart the computer. When the installation is ready grub.cfg will look like this:
menuentry "Exton-Slack 14.0" {
linux (hd0,msdos1)/boot/vmlinuz-3.9.6-x86_64-exton root=/dev/sda6 quiet
}
Change line 3 to linux (hd0,msdos6)/boot/vmlinuz-3.9.6-x86_64-exton root=/dev/sda6 quiet
No GRUB installation installation
If you already are using Grub Legacy (old Grub) as boot loader, add instead the following lines in GRUB (menu.lst) and restart your computer. I.e. edit /boot/grub/menu.lst on the Linux partition where you have installed GRUB Legacy in the past. This partition is mounted at /mnt in Exton-Slack.
######################
title Exton-Slack Linux
root (hd0, 5)
kernel /boot/vmlinuz-3.9.6-x86_64-exton root=/dev/sda6
boot
######################
Grub2
If you already are using Grub2 (new GRUB) as boot loader, you should instead add the following lines in the file /etc/grub.d/40_custom and then run the command update-grub (in the system where you have installed Grub2). NOTE: Normally it should be as simple as to just start up the Linux system, where you have Grub2 installed and run update-grub. Your file /boot/grub/grub.cfg should be correct after that. Check it!
######################
menuentry 'Exton-Slack (sda6)' --class gnu-linux --class gnu --class os {
recordfail
Set gfxpayload=$linux_gfx_mode
insmod part_msdos
insmod ext2
Set root='(/dev/sda,msdos6)'
search --no-floppy --fs-uuid --set = root e22e68cd-4812-491a-8886-c319dc710116
linux / boot/vmlinuz-3.9.6-x86_64-exton root=/dev/sda6
}
######################
You must of course set the correct uuid for your install partition. Run blkid /dev/sdaX.
Problems with external hard drives
On one of my computers, I have an external hard drive connected. Exton-Slack 14.0 could not not run from dvd with this external the hard drive connected. While disconnected the Exton-Slack dvd worked as expected. Another "problem": My first internal hard drive, which typically will be labeled /dev/sda became known as /dev/sde. My second internal hard drive, which normally has the name /dev/sdb became known as /dev/sdf in Exton-Slack 14.0. Why I do not know. This is of importance if you plan to install Exton-Slack 14.0 to HDD. Make sure that you install on the correct partition!
Configuring X
When you run Exton-Slack from disc/dvd X will be autoconfigured (unless you have a very unusual video card and/or other unusual hardware). After installing Exton-Slack to hard drive, you need to configure X using the command xconf or X -configure. On one of my computers with an ATI graphics card it did not help with the aforementioned commands. I was forced to use this somewhat odd configuration file (xorg.conf). Place it in /etc/X11 and then run the command kdm. Then log in to KDE 4.10.4 as live or root with password live respectively root.
Good luck!
exton /130619
BACK